Hey Everyone!
Decided to create a quick guide on how to create a countdown using a few different I/O and logics. This is fairly simple, but it demonstrates possibilities.
This tutorial will use:
- logic_case
- math_counter
- logic_timer
- logic_relay
- logic_branch
It should give you some basic knowledge on how they work.
This is not necessarily the most ideal way to create this counter, however it is for educational purposes and can assist in learning.
1) Creating the Numbers
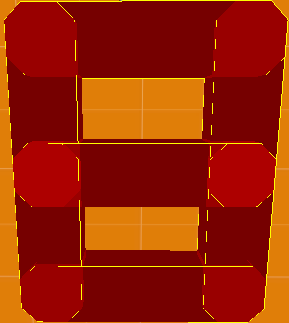
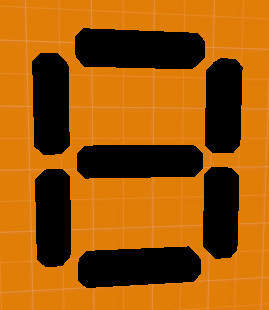
This is a fairly simple step. You will want to create an "8" using 7 different brushes, such as the one in the picture below.
(for those who have trouble seeing the 7 brushes)
Once that is done, click on one of them and press "CTRL-T" on your keyboard to open the Object Properties window. Here, change the "Class" to "func_brush" and give the number a name. For example, 1_1 (representing the first line of the first number). Be sure to enable the "Ignore player +USE" flag.
Repeat this for all 7 brushes, giving separate names to all of them. We are using "func_brush" as you can easily toggle the visibility of them.
2) The math_counter
Next, using the "Entity Tool", create a "math_counter". As the name suggests, this has the ability to count numbers, and do various mathematical equations.
You will only require one math counter per number, so name it something like "counter_1".
Finally, set the Properties to the following:
- Start Disabled: No
- Initial Value: 5
- Minimum Legal Value: -1
- Maximum Legal Value: 10
This simply means the counter is enabled, can't go below -1, can't go above 10, and starts at 5.
For now, we will leave the math counter at that.
3) The logic_relay (optional)
This part is unnecessary. I am only adding it as an example, and also to keep the counter a bit neater.
For this you will need to create 10 "logic_relay" entities. Simply label them from 0-9, representing the numbers 0-9
Next, in the Outputs tab, create the following Output:
- My output named: OnTrigger
- Targets entities named: (func_brush1)
- Via this input: (depending whether you want it to be visible or not)
For example, if you were making a logic_relay for the number "0" it would enable all of the func_brush's except for the middle one. (resulting in a 0)
What we have done means, if we "Trigger" the logic_relay (through means such as a button) it will Enable or Disable the func_brush, depending on what your choice was.
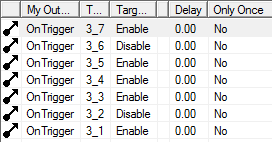
So for example, the logic_relay for the number 2 would look something like the following:
Repeat for all numbers 0 through 9.
4) The logic_case
A logic case allows you to set a variety of I/O that is based on a number of cases.
For this example, we will be making cases for the numbers 0-9, so we can display the numbers that we want.
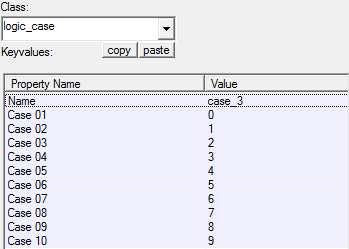
So create a "logic_case" entity, named something such as case_1. Add the values 0-9 through Case 01 to Case 10. This will allow us to select them all.
Now this is where our logic_relay's come into play. Go into the Outputs tab, and create Outputs in the following way:
- My output named: OnCase01
- Targets entities named: (logic_relay that is equal to 0)
- Via this input: Trigger
This simply means, if Case01 is chosen, the logic_relay that you put in the target field will be triggered, triggering its outputs and setting the func_brush's to the number.
5) Back to the math_counter
Now we are going to create a way for the logic case to compare the values to the math_counter.
On the math_counter, create an Output using the following:
- My output named: OnGetValue
- Targets entities named: case_1
- Via this input: InValue
This basically means that if the value of the math_counter is 'called for' it will feed its value into the logic case, thus picking the case based on the value.
6) The logic_timer
So we need a way for the math_counter's value to constantly be called for. The easiest way for this is using a logic_timer, so go ahead and create a logic_timer entity.
This is a very basic step. Simply name it something such as "timer" and set the Refire Interval to a low value, such as 0.01. This means every 0.01 seconds, the timer will start counting again.
Next, into the Outputs tab, add a new output:
- My output named: OnTimer
- Targets entities named: (your math_counter)
- Via this input: GetValue
This simply gets the value of the math_counter. So now if you have followed this correctly, your counter will be working. The only issue is, you need a way to change the values on it.
7) Changing the math_counter values
Just for a bit more experience, I will be showing how to make a shootable object that changes the value. The reason I will not be using a shootable button is that doesn't work too well with quick bullet fire, and will only decrease the counter by 1 every second.
So create a prop_dynamic, with any name and any World Model, it really doesn't matter. Add an Output using the following:
- My output named: OnHealthChanged
- Targets entities named: (your math_counter)
- Via this input: Add
- With a parameter override of: 1
This means if you shoot the prop, the counter will increase by 1. You can do the same, except using subtract. Subtracting is ideal for boss HP bars, or any other 'killable" object.
8) Fixing up the counter
So you may have noticed that the math counter goes from -1 to 10 even though the numbers are 0-9. This allows us to do other effects with the counter, such as make the numbers loop over or integrate other numbers (to make the counter use more than 1 number)!
This is very simple, just create an output on the math_counter:
- My output named: OnHitMax
- Targets entities named: (for this example, use its own name)
- Via this input: SetValue
- With a parameter override of: 0
This simply means that if it hits 10, it will reset to 0. You can also make it if it hits minimum (-1) it will go to 9.
Later on I will add how to add extra counters, to make multi-number counters using these methods.
I have made an example that has 2 numbers, a box that when shot lowers the number by 1, and a button that when pressed raises the number by 15.
https://dl.dropbox.com/u/80605475/hpbar.bsp <--- BSP
https://dl.dropbox.com/u/80605475/hpbar.vmf <--- VMF
Note for more experienced hammer users, instead of using logic_relay's to change the numbers in a clean fashion (instead of jamming 50 outputs onto a logic case), you can use env_texturetoggle and change the texture of a box to the different numbers.
Final Notes
Again this may not be the best way to create a counter, but it gives users a basic understanding of a few logic entities. The reason behind me making this guide is, I was testing some ideas based off a zombie escape map, "ze_portal_story" to use in my upcoming map for bossfights. I plan to use a similar, but more optimised system.
I hope I have taught some of you something. If you have any questions, please post them. thanks for reading. ^^


 Reply With Quote


